Cross Stitching for Beginners
I’ve been working with cross stitch for a lot of my recent projects, and one reason I like it is because it’s so simple, yet when viewed as a collective of thousands of stitches, can create a complex image. The grid is laid out for you, holes ready to stitch through, and all you have to do is make little x’s. It’s also great for a project like this one, where many people are contributing, because it’s an easy craft to learn.
If you’re a first-time cross-stitcher, or if this is the first time you’ve ever threaded a needle, WELCOME!! You’ve now joined in a craft that dates back hundreds, if not thousands of years. Also, thank you from the bottom of my heart, for learning a new skill to contribute your time and effort to this project.
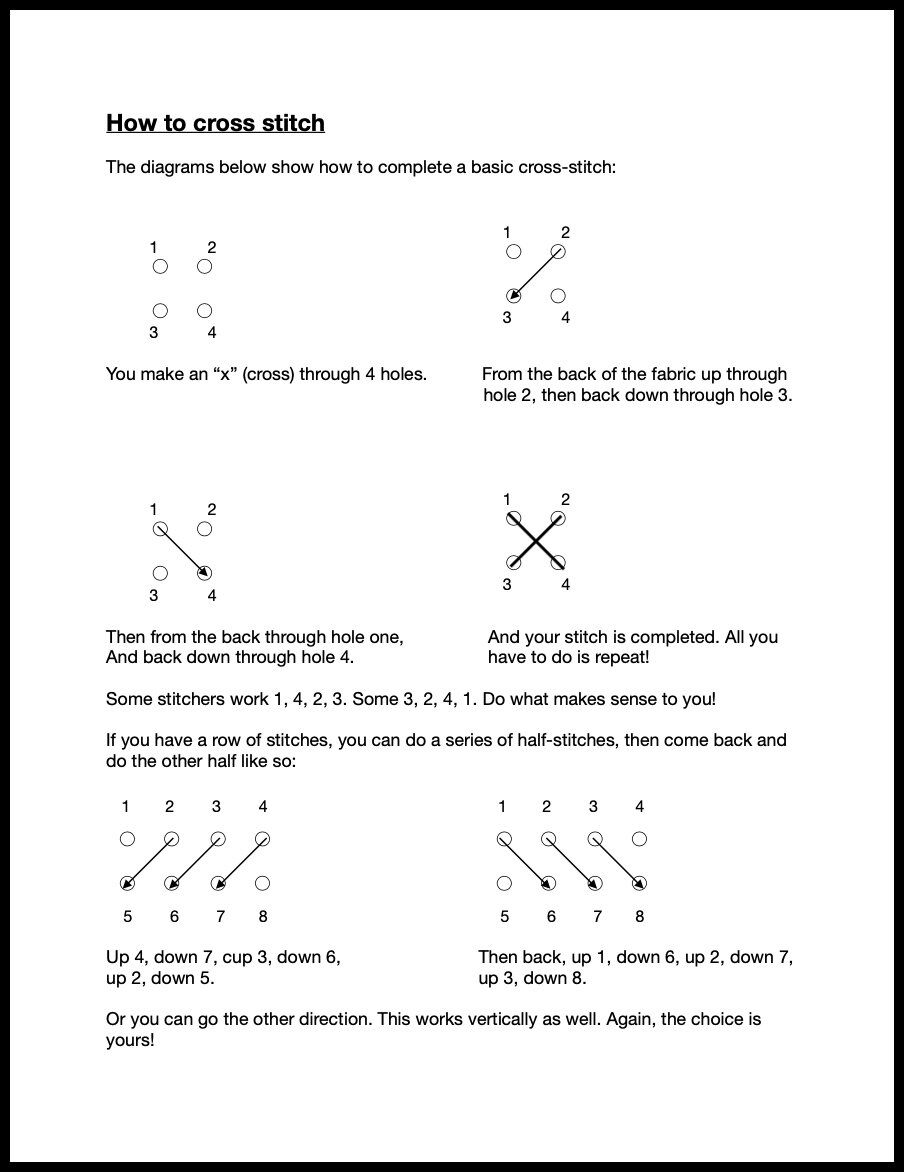
If you’re having difficulty you can find loads of videos online about how to cross stitch. Many videos will include far more information than you need for this project, or demonstrate different kinds of stitches, or recommend different amounts of thread (this project uses 3 strands). I made a few instructional videos with the help of my amazing local library maker space, which you can find here, and have included a couple other videos that fit this project best on this page. All individual craftspeople and artists have their own little tricks and tips — some are left-handed vs. right, some use variants of tools, etc. — so if something doesn’t make sense to you, try a different video. If you watch a few different people’s methods of working, things will probably start to click. If you prefer in-person learning, or videos don’t work for you, I bet someone you know knows how to cross stitch and you can ask them for help. Just make sure to wear a mask while you’re hanging out!
Materials & Tools
Most of what you will need for this project is included in the kit that I will send you after you’ve filled out the sign-up form.
Fabric provided is 14-ct aida cloth, which means there are 14 stitches per inch.
Thread provided is DMC 6- stranded cotton embroidery floss #498 (red) and #820 (blue).
You will split the threads into two sections of 3-strands to stitch with. The beginning of this video demonstrates an easy way to do this.
The needle is a #26 embroidery (sometimes called a cross stitch) needle, which has a blunt tip.
A needle threader
You also need the following items:
Sharp scissors
Red and blue embroidery floss to fill in the outline. You can use this handy thread estimator to figure out about how much thread you will need. Make sure you specify 3 strands of thread and look for 14-ct aida cloth in the chart.
Optional stuff that can be useful:
Thimble (especially if you prefer a sharp needle; the one included in the kit is blunt, but after repeated use can still make for sore fingertips.)
Water-erasable fabric marker to mark any design you might want to use to fill in the outlines.
Embroidery hoop. The fabric used for this project is quite stiff and does not need an embroidery hoop in order to stitch. If you prefer to try one, you can absolutely do so. My favorites are the “Q-Snap” or “Sew Easy” rectangular kind as they don’t crease or distort the fabric as easily.

